Showing posts with label Thrifting. Show all posts

Monday, October 21, 2013

How to Make an Inexpensive, Homemade Mass Kit for your Kids

Several weeks ago a reader asked if I knew of an inexpensive mass kit for children. Of course I did! You can buy them on Etsy! Wait, no you can't.

The two ladies who were selling (update: they are now available again!) them are currently not doing so. There is the plush set by Wee Believers for $70.00 (currently out of stock on their website) and the brass set by Our Father's House for $140.00, which are great options, but outside of the "inexpensive" realm. Even the ones on Etsy were going for a justifiable $35.00-$40.00 plus shipping. So this got me thinking... if no one is selling an inexpensive set then I'll just have to figure out a way to make one.

Introducing the as little as $20.00 homemade play Mass kit for kids!


The goal when putting together this kit was to make it as cheap and easy to make as possible. So yes, even you, my "not-so-crafty" friend, can do this. And if you make multiple sets, the cost of each set goes down, so start thinking now about who on your Christmas list would love a mass kit for their kids! (P.S. According to Fr. Z, it is not a sin for your children to play mass.)

Here are the supplies that you will need:


Dollar Tree
2 Electric Tea Lights - $1.00

Target
Plastic Chalice - $2.99
Plastic Appetizer Plate - $1.99

Craft Store
Spray Paint - $2.99
Stiff Felt in 5 Liturgical Colors - $0.99-$4.96 (You really only need white.)
Regular Felt in Cream- $0.29
Ribbon in 4 Liturgical Colors - $3.99 - $15.96 (You could chose to only do green.)
2 White Bandanas - $1.99 each for a total of $3.98
Gold Puffy Pain - $1.29 (optional)
(I went to Michael's. If you are patient you can get these things on sale or with a 40% off coupon!)

Total: $18.22 - $35.45

And here is how to make it:

Chalice, Paten, and Hosts


For the chalice and paten we simply spray painted the plastic chalice and appetizer plate that I bought at Target. For the hosts, I cut out one large circle (3.5 inches) and six small circles (1.75 inches) from the regular cream felt and then added a gold puffy paint cross to the large circle. When using puffy paint make sure to tap the bottle down before each use to ensure that it doesn't leave a yucky air bubble splat.

Pall


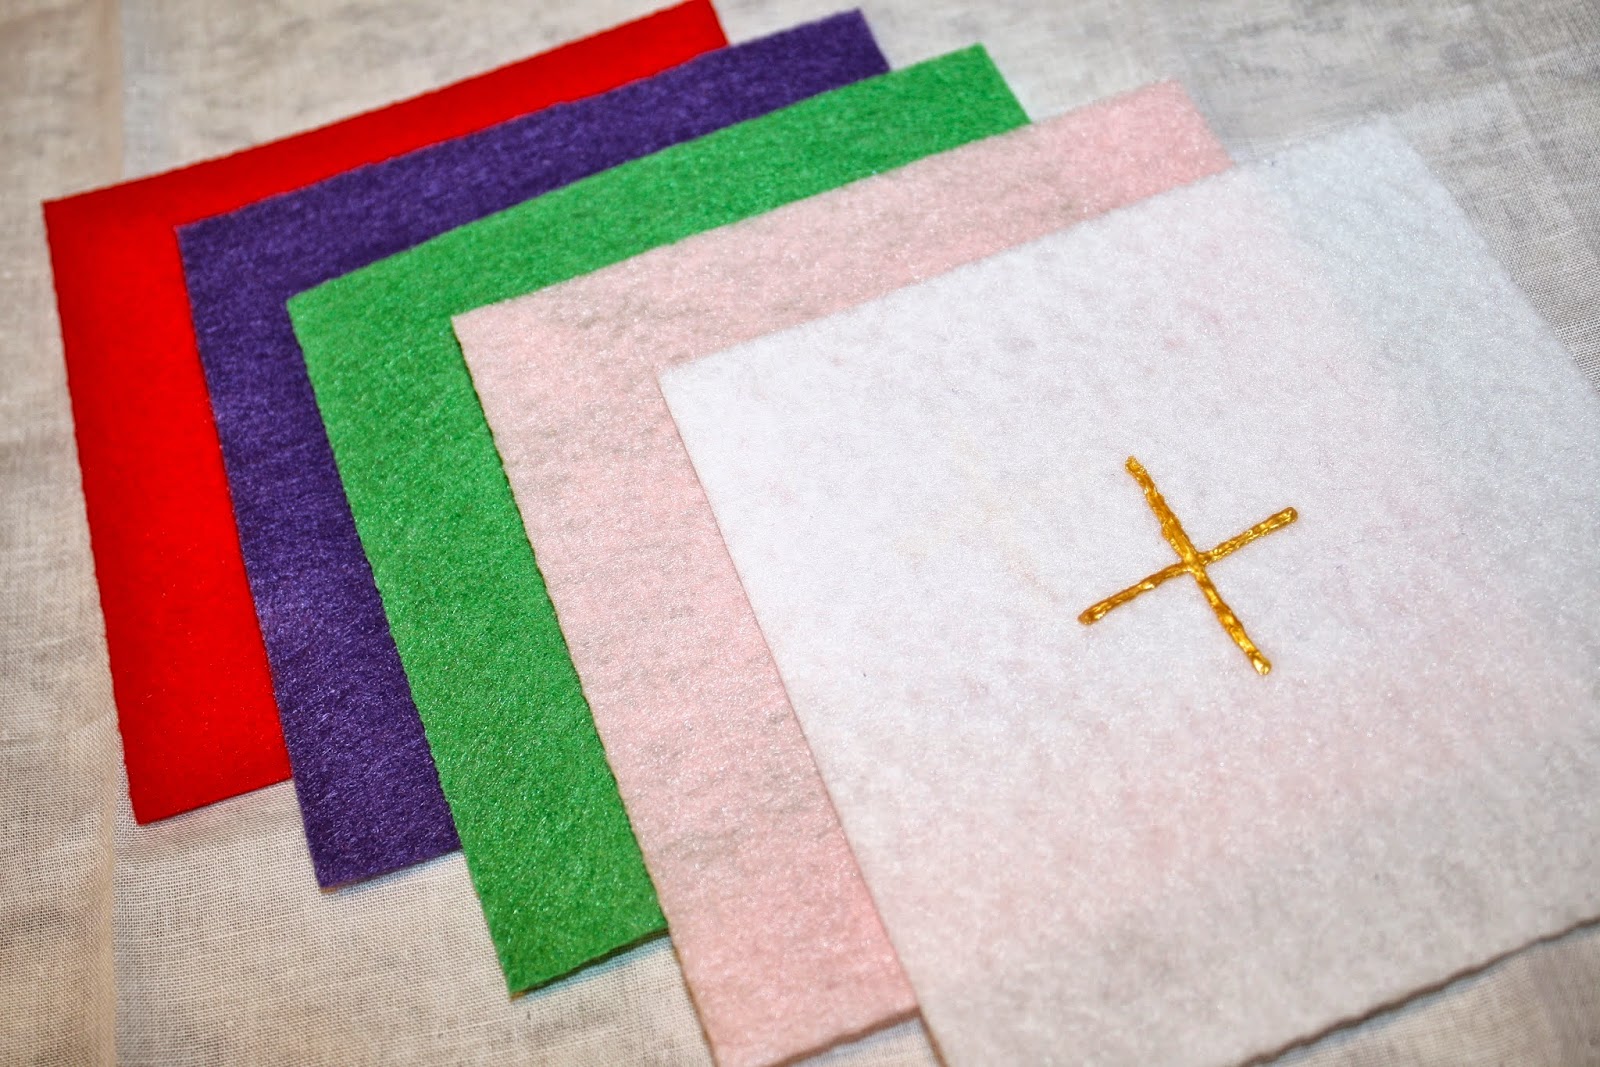
For the Palls I just cut 5x5 inch squares out of stiff felt and added a gold puffy paint cross to the middle of them. Palls are only found in white at mass, but to help emphasize the liturgical colors you could opt to make a set in other colors as well. With the 5x5 inch square, you can get two palls out of one 8x12 sheet of stiff felt. If your chalice is smaller than mine, you could even get up to six out of one sheet!

Corporal and Purificator


The corporal is just a plain white bandana, folded into thirds twice to make nine squares. No sewing here! You could add a red puffy paint cross to the middle of the corporal if you want to be extra fancy.


For the purificator I cut a second bandana in half and sewed the cut edges to keep it from fraying. This gave me two purificators. As to the sewing, it's just one straight line, you can do it! I then folded it into thirds and then again in half. Again, a red puffy paint cross on the purificators would be a nice touch.

Stole


The stoles are made out of 1 1/2 inch ribbon in various liturgical colors. I cut them to be 1 1/3 yards long, making it possible for me to get three stoles out of each four yard spool. This is where making multiple kits really drops the cost of each kit! More puffy paint crosses were added at the bottom of each stole.

If you really want to hit a home run in the liturgical dress up area, you can also purchase or make a white alb. Options include a $7.50 white robe from Oriental Trading Company or an altar server alb from a Catholic distributor, such as Autom.

Candles and Crucifix


No altar is complete without candles and a crucifix!


Battery operated tea lights are a steal at two for $1.00 at the dollar tree and I used a crucifix that we already had. I believe we received it in an appeal letter from a Catholic organization.

Extras


There are a few more items you can consider adding to your basic mass kit...

Finger Bowl: Used by the priest to wash or dip their hands in water at the beginning of the liturgy of the Eucharist.
Finger Towel: The priest uses a finger towel to dry his hands after his washes or dips them. The towel is like a corporal, so you could even use the other half of the white bandana for a finger towel. (not pictured)
Altar Bells: I made my bells out of some store bought bells I had lying around, cut up and painted gold wooden bamboo skewers, gold ribbon, and lots of wood glue. It's Pal's favorite part of the kit.
Holy Water Bottle: Okay, what I really want it a cruet set (this one is sold for oil and vinegar, not water and wine, but it will totally work for a playset!) but those are expensive, so I settled for just a holy water bottle for now.


And of course there are still more things you could add, such as an incensor, candle snuffer, sanctuary light, lectionary, etc!

That's it friends, get crafty and raise some saints!

Be saints, it's worth it!
Lisa


Thursday, October 13, 2011

All Saints Day/Halloween Saints Costumes

Last week I received an Oriental Trading Company catalogue and flipped through it expecting to see the same crafts and cheap toys that I steal ideas from and re-create myself, but then something caught my eye.

$6.00 robes and $3.00 veils in any color in the Christmas pageant section.

You're shocked too right? I about called my husband I was so excited.

Let me explain. For the past several years I've been making my kids saints costumes. While I have (mostly) enjoyed doing that, this year, it's just not happening and I don't want a repeat of last year when I scrambled to make a costume for my 2 year old. My original plan was to not dress him up, then guilt set in.

Look at my adorable St. Anne. She's wearing a black robe and red veil. Humm, I could buy that costume for my 5 year old for $9.00.

Mixing and matching robe and veil colors lead to endless saint possibilities. If you order all black your child can be Benedictines like Sts. Benedict and Scholastica. Brown for Carmelites like Sts. Francis of Assisi and Therese of Lisieux. White for your son to be a Dominican like Sts. Dominic and Thomas Aquinas and the next year you can add some wings and a halo so your daughter can be an angel. OR you can add an over the arm sash to a brown robe and become almost any biblical character.

Unfortunately, they don't have toddler sizes, and you'll need to attach the veils on as hoods for some of these, but I don't think that would be too difficult... think tucking it in behind the kids neck and using safety pins. Still if you think outside the box, you could come up will all kinds of cheap ideas!

They also had some other options.

For $10.50 my now 3 year old will be St. George the dragon slayer. And for $6.00 my 5 year old daughter will be Queen Esther in a purple robe. I'll need to make her a gold sash and crown, but that will be nothing compared to years past.

They have plenty of beautiful Mary costumes for as little as $13.00 and of course St. Joseph! The robe is so colorful I think you could be either biblical Joseph.

And thanks to the Easter pageant, your child can even be Jesus for $10.00. I love the beard, but it's $6.50 more.

They actually sell monk costumes so you can have a Franciscan for as little as $7.99!

I'll be sure to post some pics of the kids when we put these cheap and easy costumes on for our up-coming All Saints events!

Tuesday, January 18, 2011

Holy Medal Earrings

Ladies, I am happy to bring to you the latest Catholic trend, fresh from the FOCUS conferences. The on-campus missionaries are the ones who keep me up to date on trendy ways to share your faith with style, so today I'm happy to pass their wisdom on to you.

Presenting, holy medal earrings...


"Where in the world can I get these?", you ask. "They are so cute!" I know, I know, but remember, I didn't invent them... I'm not sure who did. I believe some vendors were selling them at the conferences, but I decided to make my own.

All you need are medals and hooked wire, found in the jewelry making section at any craft store.


I suggest mini-medals, as opposed to the standard sized medals, but you can do whatever you want, they are your ears. One missionary even had the big circle St. Benedict medals, those were awfully stylish too. I bought about 50 mini Miraculous Medals for 3 euros when I was in Rome in college and still have several that I haven't given away. They were blessed by JP II.... it's pretty sweet. If you want me to send you a pair of medals, post a comment and I'll hook you up.


I removed the wire loop on top of the medal so they face out as opposed to the side.


Then I slid them on the loop. Neither of these tasks required any special tools, I just used my hands to pull the metal apart.


Now you too can be the cutest Catholic in your pew. 

(I took that picture myself, with the help of my bathroom mirror, I felt very innovative for a few minutes.)

Wednesday, October 27, 2010

How to Cut your Grocery Bill in Half

No, this is not an advertisement. It's a way of saving money often called "the coupon game" and I love it! About a year ago I was introduced to this fun and exciting (well, I think it is) world of saving major bucks on your grocery bill. To keep your attention I have included a few recent receipts.


Full Price: $148.43, Paid: $59.20, Saved: $89.23


Full Price: $118.90, Saved: $59.99, Paid: $58.91

I'm guessing many of you have heard about the coupon game, but may be skeptical of this unconventional way of shopping. I wasn't a believer until I tried it myself and it works. How you save so much is by only buying things that are on a good sale and then adding a coupon to the sale item whenever possible. By stocking up when things are cheap you create a mini grocery store in your basement and thus rarely pay full price for food and household supplies.


Part of the basement grocery store

It takes some getting used to because you don't really have to plan out meals for each night of the week. I probably have food for 30 dinners in my house right now and each afternoon I just think... "What do I feel like tonight?". After I have decided what strikes my fancy I go "shopping" downstairs. So are you in? If yes, here is the rundown: Warning, it does take some prep time.


1. Know your stores. You can only get great deals if you know what your stores offer. Give them a call and ask them the following:
A. Do you double coupons? Most stores will double up to $1.00; $0.30 becomes $0.60 and $0.75 becomes $1.
B. Do you accept other store's coupons? For example, accepting a Walgreens "only" coupon at X grocery store.
C. Do you offer scan guarantee? This is if an item rings up wrong you get if for free... I've gotten free cheese and pizza this way. Either they will give you one item free (even if you bought 5) or they will give you all the items free.
D. Do you match competitors prices? Target does this "as is" and Walmart will do it, but not if it is a buy one get one free or 50% off deal.
E. Can I get $0.05 back for each reusable bag that I bring in?
F. If I bring in a store coupon (target specific) and a manufacture coupon (general mills cereal) will you take both for the same product?
G. Will you take expired coupons... if so, 
how expired?


2. Make a master list of frequently used items. I have on my computer a list of things I frequently buy (canned soup, chocolate chips, pasta, dried fruit, cleaning supplies...). I review the list every so often to make sure I have a stock of the things I need. If I am running low on a product I start watching the ads to see when it goes on sale so I can stock up (last week I bought 20 boxes of pasta and 20 jars of sauce... they won't expire until 2013, I think I'm good).


3. Collect your coupons. There are several places to get coupons, save them all until they expire. You might think I would never buy that! BUT, you might buy it if it is free! I "bought" 6 bags of nature valley granola clusters for free... I wouldn't buy them at their typical $4.00, but I'll take them for free!
A. Subscribe 
to your local paper. Save the coupon booklets in a 3 ring binder until they expire, just because you won't use a coupon this week, doesn't mean you might not need it next week or in a month.
B. Check for printable online coupons.
Grocerysmarts.com has it ALL. Just make your way through each of the groups (A, B, C and singles) to see them all. You will need to install something to print, but after that it is a breeze. You can print 2 of each coupon (you need a coupon for each item you are buying... 5 bags of chips needs 5 coupons). New coupons come out at the beginning of the month, so this is the best time to get them. There is a limited number of coupons that can be printed across the nation, so once that number has been hit, the coupon disappears.
C. Gather coupons from products you buy. Backs of cereal boxes, inside oatmeal boxes and inside muffins boxes are just a few places I have found coupons.
D. Check 
your local grocery store website for coupons you can download right on to your saver card. These coupons will not double.
E. Check 
your stores for printable coupons. Target has a ton of Target specific printable coupons on their website.

F. You can even buy coupons online at sites like thecouponclippers.com for a small handling fee.


4. 
Look through those ads! Ads come to my mailbox on Tuesday, so when the kids go down for their nap I start circling all the items that I might want to buy and crossing off items that are on sale for a cheaper price than another stores advertised price. I've seen weeks where potatoes are on "sale" for $3.99, $2.99 and $1.99, depending on the store... obviously you want to get them at the $1.99 store.


5. 
Match your coupons with sales. This is where it gets really fun. I pull out my coupons and check the web to match up products. I have gotten TONS of free things from granola bars to deodorant to frozen veggies to chicken broth to chex mix... I could go on. Once I got PAID $1.00 to buy five tubs of icing... that was really cool.


6. 
Make your lists. I then write a list of specific things to buy from each store and make a pile of coupons to put with each list. I also add to the list where to buy things I don't have coupons for. Someone usually has bread, milk and bananas on sale, so I buy them according to the cheapest store. I also write a list of things that I need that I will have to pay full price for. This list is a sad list, but must be done.


7. 
Have fun shopping! I get really excited watching the total drop and drop. At first I would point out my free items to cashiers, but they didn't appreciate it, so now I call my husband or text a local friend, so they can join in on the fun!


So yes, you do have 
to put a little money into buying the newspaper and ink for the printer, but I used $35 in coupons last week alone, which paid for the newspaper for the year. And yes, it does take time, but I like to think of it as giving myself a $100 paycheck for saving a $100.


The final awesome part about all of this is you don't have 
to stock shop every week! When things are busy I take a week or three off and just go to one store to buy about $20 of perishable necessities and I am set because I have so much at home on reserve. And with so much at home I don't find myself running to the store for that one ingredient I need to finish a recipe, because I have more in the basement!


Now I know what some of you are thinking... Lisa, you are expecting me to go to multiple stores... it's difficult enough to make it to just one with the kids! Well, here is my secret, on Wednesday morning (when the new sales begin in my area) I wake up at 5:30, hit three stores and return home by 7:30 with my loot. I know 5:30 is early so some fellow thrifty mom's will make the rounds in one night after the kids go down or brave it with the kids. Remember, once you are stocked, you don't have to do it every week!

Happy shopping!

Tuesday, October 26, 2010

From Napkins to Vestments

All right procrastinators, this one's for you. Homemade vestments for All Saints Day in less than an hour. 
Isn't he cute!

Materiels: 
Two cloth napkins in green, red, white or purple, depending on what liturgical season you are going for
2 1/2 yards of 1 1/2 to 2 inch gold ribbon
Hot glue gun and/or sewing machine


Step 1: Sew or hot glue 1 1/2 to 2 inch gold ribbon onto both sides of the napkins. Pictured is the back side.


Step 2: Sew the tops of the napkins together leaving a 7 inch gap in the middle.


That's it folks! Enjoy!

Saturday, October 23, 2010

From Pants to St. Francis Tunic

Over the years I have made many of my kids Halloween/All Saint's Day costumes. First, there was the infant of Prague costume for when our kids are infants.


Then came St. Anne.


Next Our Lady of Lourdes.

Last year after we moved I didn't have it in me to pull off elaborate (this is a relative term) costumes for my kids. Fortunately my daughter wanted to be a guardian angel ($10.00 at Walmart- yes please), but my one year old son didn't have an opinion. I wasn't going to put a costume on him, "We just moved in (is 3 month ago "just"?), it's been too crazy, he'll understand when he's older". On about October 29th, I started feeling guilty. I ran to Walmart and bought some green cloth napkins from the clearance aisle and gold ribbion and here's the result...

He was an ordinary time priest.

This year I wasn't feeling particularly creative again, but fortunately my girl wanted to be a guardian angel again... good thing I bought last years $10.00 costume a little big. My son, now 2, still didn't have an opinion, so he was just going to be a cloth napkin priest again... until my husband brought me a pair of worn out brown pants that he declared destitute.

Notice the lovely ink marks (he's a writer, he can't help it) and the worn pockets


After a long string of children's books about pioneer women who saved all their scraps of fabric for quilting I began feeling uneasy about just throwing them in the trash. The pants sat on my dresser for a while until I had the crazy idea of turning them into a St. Francis of Assis tunic.


It doesn't have a hood, but I was working with a pair of pants. It also could be a great Bl. Kateri Tekakwitha or St. Padre Pio base. My plan is to go buy some rope to put around the waist and call it good.

Below is the best I can do to explain what I did, for anyone else who is having "quilt story guilt".

Here they are, the pants that I will magically turn into a tunic.


First cut the pants on the inside inseam to open them all the way up. Cut away the waist band, zipper and pockets, keeping as much of the fabric as possible. What you see above: The seat of the pants are in the middle and the holes on each side are where the pockets where. The waist band would have been all along the top. The middle is lower because I had to remove the back pockets. The pumpkin is to add a splash of festiveness.


Cut off the bottom portion of the pants (from what would be about just below the knee down) for the sleeves. This really depends on how tall your child is and how long the sleeves need to be.


Take out the hems to make the sleeves longer, if needed. Each leg will be one sleeve.


Fold over the excess fabric in the seat area to form a straight line. It's the extra at the top of the pants near the middle "V" where the neck will go.


Cut off the extra fabric.


Sew together the two sides of the fabric, essentially joining the legs. You will not need a glue stick (near the sewing box) for this project, my daughter must have put that there.


Fold the other half of the legs in to create a vest, then remove the excess fabric like you did on the other side. Sew the two side of the fabric together , like you did on the other side. 


Sew the tops of the vest together for where the vest will rest on the shoulders. This would have been the top of the pants where the waist was cut up earlier. 
Measure the pant legs to make sure they will fit into the former pockets, now arm holes. You may need to cut the arm holes a little bigger. Cut the sleeves to a proper width so they will fit into the arm holes and sew them into a tube.


Sew the sleeves into the arm holes.


Turn everything inside out and you have a tunic! I didn't hem the bottom or the neck because I feel like the more worn looking it is, the more St. Francis like it will be... and to do that would be more work.


Thursday, October 21, 2010

The Rosary and Kids - Part 3


A few years ago Magnificat began selling rosary greeting cards with 20 different images depicting each mystery of the rosary. While I wasn't too interested in using them as greeting cards I was interested in the fact that they were each a perfect 5 x 7, which means they could be framed.

At the time we were just beginning our first year as FOCUS missionaries, so the "decorating the new home" budget line was minimal. In our cozy cinderblock dorm suite, where I was a hall director, there was a large empty wall that I wanted to fill with some kind of religious art, but let's face it, religious art is not cheap. So when I saw these beauties I knew I had a solution to my problem. To frame the pictures I purchased clip frames for less than $2.00 each, including the shipping charges. If you buy them in bulk you end up buying 24, so the extra 4 are a bonus.

When we pray a family rosary we grab the picture(s) of the mystery we are meditating on from the wall for  a visual during the prayer. Pointing out the details of the images has been a great way to help explain the mysteries and to introduce our children to beautiful art. We also love them because they are a constant reminder in our home of the significant events in the lives of Jesus and Mary.

Cost rundown:
Rosary Greeting Cards: $20.00 (after shipping)
Frames: $37.50 (after shipping)
Total Project: $57.50

We hung them with a 1/2 inch spacing around each side of the frame.
Pal picking out a mystery... or 3.

Also, I keep forgetting... for more awesome ideas check out the Catholic Icing link up party. Bloggers have posted their ideas for the rosary here in one place.

Thursday, September 23, 2010

We "Finished" the Basement!

The finished basement!
Over the past few months I began to notice that the kids toys, particularly large plastic toys like little people buildings, were taking over my living room, so I began to brainstorm my options.

1. I could get rid of the toys... but then I pictured my kids sitting on the couch in the middle of winter with sad faces and nothing to do.
2. I could commission my husband to finish the basement... but then I pictured my husband (not handy) spending his weekends staring at tools and not knowing what to do.
3. I could hire a professional to finish the basement... but then I pictured myself on the phone all day talking to contractors and then at home all day while they worked and my kids didn't nap.
4. I could "finish" the basement myself in my typical thrifty manor with at $250 budget in one weekend... but... well, nothing, it was the perfect solution.

So, here is what I did:

First I measured the wall space that I would be covering (we split the basement in half, the other half is for laundry and storage), then I bought flannel fabric from Joannes when it was 50% off for $78.53. I then cut the fabric, hemmed it and made a loop for a pole to go through.

Next, I went to Walmart with my measurements and bought skinny curtain poles and mug hooks ($42.18) to hang the fabric with. We (okay, Kevin did this one, isn't he handy?) screwed the hooks into the beams of the unfinished ceiling and hung the poles with the fabric on them.


Finally we found some new carpet and a pad on craigslist for $100.00, then cut it to fit the area we needed and volia! we had about 200 new square feet for the kids to play that didn't require my living room to pose as a plastic wear house for a grand total of $220.17... about $30 under budget!